How to Install a Super Safety Trigger (Easy Step-By-Step Guide)
Installing a Super Safety trigger system is much easier than most people expect—especially if you’ve ever installed a standard AR-15 trigger before. In fact, the Super Safety installation process is nearly identical to a traditional mil-spec trigger install, with just a few additional components.
This guide will walk you through how to install a Super Safety, what tools you need, and what to expect during setup.
Whether you’re running a Complete Mil-Spec Super Safety Kit, a Premium SSA-E Super Safety Kit, or pairing the Super Safety system with a compatible pre-cut trigger, this install can typically be completed in 3-5 minutes.
What Is the Super Safety Trigger System?
The Super Safety trigger system is an active-reset, multi-position safety setup designed to work with Super Safety compatible triggers, including mil-spec and select enhanced triggers from Geissele Automatics.
👉 If you’re still choosing a setup, check out:
- Complete Mil-Spec Super Safety Kit
- Premium SSA-E Super Safety Trigger Kit
- Enhanced Straight Trigger Kit
- Super Safety Cam, Lever & Detent Kit
- Pre-Cut Super Safety Compatible Triggers
Tools Needed for Super Safety Installation
You only need basic AR tools:
- Punch set or small allen key
- Flathead screwdriver or hex key (for grip screw)
- Bench block (recommended)
No specialty jigs or gunsmith tools required.
Super Safety Installation Overview (Quick Summary)
If you’ve installed a standard AR trigger before, you’re already 90% there.
The Super Safety installs just like a normal trigger, with the addition of the lever.
Everything drops into the factory locations in the lower receiver.
Step-By-Step: How to Install a Super Safety Trigger
Step 1: Clear the Firearm
Ensure the rifle is unloaded. Remove the upper receiver and set it aside.
Step 2: Remove Existing Fire Control Group
- Remove the pistol grip (carefully retain the safety detent and spring)
- Remove the existing safety selector
- Drift out the hammer pin and trigger pin
- Remove the hammer and trigger
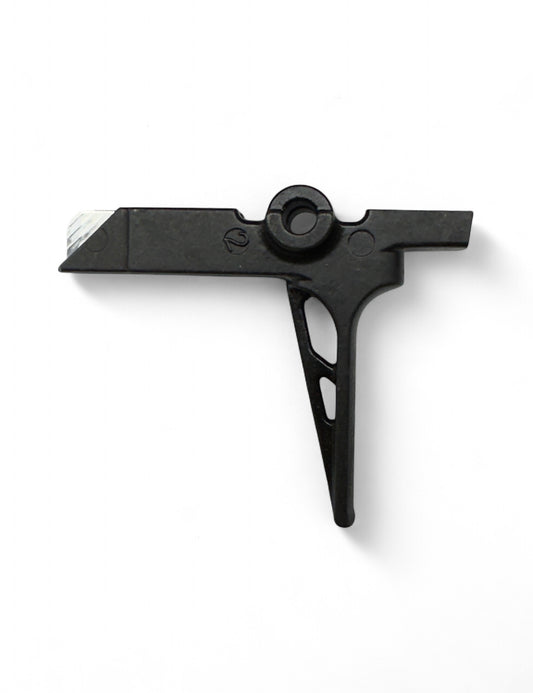
Step 3: Install the Super Safety Compatible Trigger
Install your Super Safety compatible trigger exactly like a normal trigger:
- Trigger + disconnector
- Trigger spring orientation matters (legs forward)
- Insert trigger pin
👉 Compatible options include:
- Mil-Spec Super Safety Trigger
- Enhanced Straight Trigger Kit
- Pre-Cut Geissele SSA-E Super Safety Trigger
Step 4: Install the Hammer
- Install the hammer with the spring legs resting on the trigger pin
- Insert hammer pin
- Verify smooth movement
This step is identical to a standard AR trigger install.
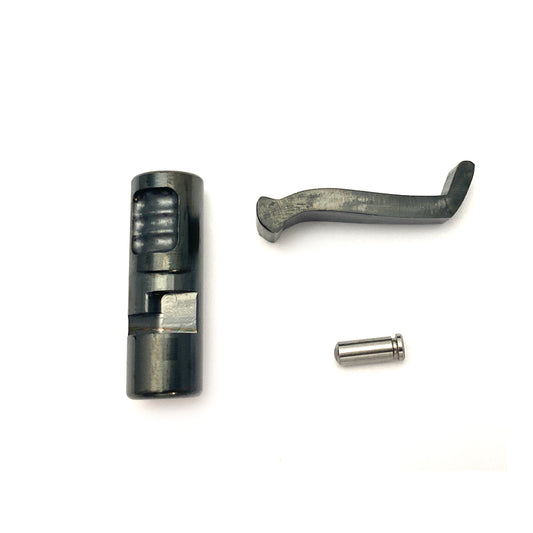
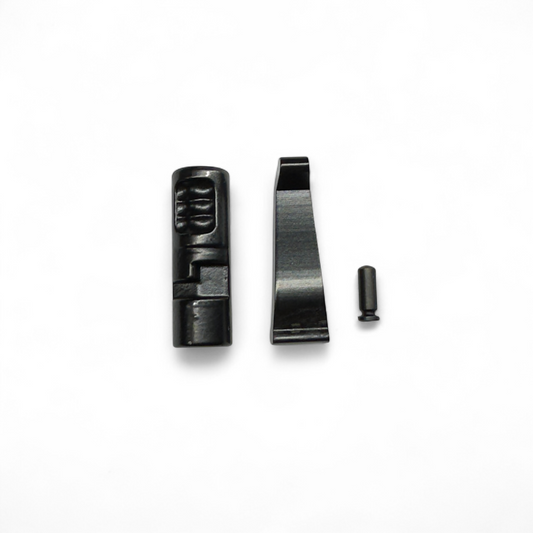
Step 5: Installing the Super Safety Cam (IMPORTANT)
This is where orientation matters.
- Insert the Super Safety cam from the LEFT side of the lower receiver, with the flat face facing out to the left.
- Push the cam inward until it sits centered in the receiver
Once the cam is partially inserted and sitting roughly in the middle of the lower, you’re ready to install the lever.
Step 6: Installing the Super Safety Lever (Orientation Matters)
With the cam centered:
- Insert the Super Safety lever into the cam
- The tip of the lever must face toward the buffer tube
- The elbow/bend of the lever must face toward the magwell
This orientation is critical for proper function.
Step 7: Install the Safety Detent and Spring
- Insert the safety detent from the bottom of the receiver
- Install the detent spring into the grip
- Install the grip and tighten securely
This step is identical to installing a standard AR-15 safety selector.
Step 8: Function Check the Super Safety
Before live fire, perform a full function check:
- Verify the selector moves cleanly between all positions
- Check trigger reset and hammer engagement
- Ensure smooth lever movement during manual cycling
If everything feels smooth and consistent, your Super Safety installation is complete.
Lower Receiver Compatibility
Your lower receiver must NOT have a high shelf.
Specifically:
- There must NOT be excess material behind the safety selector hole
- High-shelf lowers can interfere with lever movement
Most modern mil-spec AR-15 lowers work fine, but some older or restricted designs may require material removal or are incompatible.
If you’re unsure, inspect the area behind the safety hole before installation.
Why the Super Safety Is Easy to Install
Many users are surprised by how simple the Super Safety install process actually is.
- No proprietary cassette housing
- No special tools
- No complicated timing
- Installs just like a standard trigger and safety
If you can install a trigger and selector, you can install a Super Safety.
Super Safety Kits and Compatible Components
For best results, use components designed specifically for the Super Safety system:
- Complete Mil-Spec Super Safety Kit
- Premium SSA-E Super Safety Trigger Kit
- Super Safety Compatible Pre-Cut Triggers
- Replacement Cam, Lever, and Detent Kits
Using properly cut and tested components ensures reliable reset and long-term durability.
Final Thoughts
The Super Safety trigger installation is straightforward, familiar, and accessible to anyone comfortable working on an AR-15. With proper orientation of the cam and lever — and a compatible lower receiver — the system installs quickly and runs reliably.
If you have questions about compatibility, kits, or installation, check out our full line of Super Safety products and components or reach out for support.